
Hi Everyone
It’s funny isn’t it,.. how we think we can’t do something,.. until we have a go. (this is a long post, but hey, it’s the first one I’ve done for ages! ha ha)
That’s just like me and ‘mixed media’,.. I NEVER thought it would be ‘my thing’, although I do use lots of different products in my card making like paints, waxes, ink misters, pastes and so on… and there are no rules that say ‘mixed media’ has to be dark and gloomy,.. which you’ll never really see from me,.. even when I do my collage stamps,.. they’re pretty ha ha
So, I’m going to take you on a little mixed media journey with me, as I learn how to apply all the skills I already have (and learn new ones!) into what we call ‘mixed media’, but done my way.
Mixed Media – in my mind, is quite simply using different textures, products, materials, techniques and styles to create something unique.. there’s no right or wrong, just what you want it to be,.. for me,.. that’s pretty 🙂
I have created 3 canvasses now, two that I created for my Crafternoon Tea Workshops in our Nottingham and Sheffield Honeypot Crafts stores and one that I finished yesterday, that I have lovingly spent a long time getting right (it will be part of my festive dining room decoration for years to come!)
You can see my Crafternoon Tea Workshop ones over on My Pinterest page, these are 8×8 canvasses, which felt ‘safe’ to start with as it’s my favourite size of card!
This one I’m going to show you is a 20″ x 12″ canvas,.. see, I got brave after the first two and went bigger!
I found that preparation really is key, getting the base textures right and planning (you know I like to be organised!) my embellishments etc
I have two textures on my base, one created from Soft White Texture Paste (absolute must have)(the woody look, done first) and the other from our White Crackle Paste (added after), here’s a little close up of them both..
Once both layers were dry, I painted with White Gesso – twice, to make sure it was covered thoroughly 🙂


You will also notice the fab little white balls, these are artsy stones by Crafters Companion and fab for adding texture, even easier to paint your chosen colour! These were dropped into the texture paste when it was still wet so that they set into it as it dried,.. I did lose a few on the painting stage, but it didn’t matter 🙂
Then came the familiar part,.. die cutting loads (as you’d expect from me) of poinsettias,.. I used one of my older Spellbinders sets as it gives me a single petal that I can build up to make the large poinsettia in the middle..
I’ve used my own brand pearls (love these!) for the centres of my poinsettias and gave the red pearls a little whitewash too 🙂
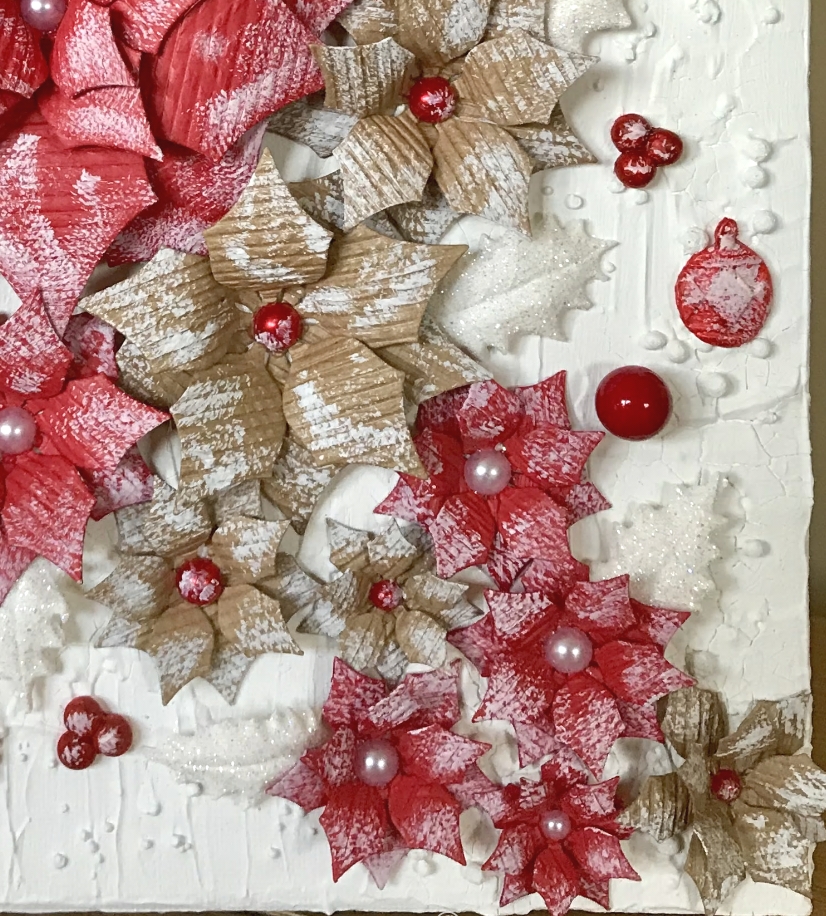
Now, and I will admit this, I am slightly (ok, not slightly) addicted to the air dry clay and moulds, which is how I created the baubles and holly and letters for this project.. it’s amazing! Honestly, if you have never tried it, please treat yourself to a pack of clay and a mould and have a go,.. it’s so easy and they are so light!
So, clearly I had fun with the moulds, but more importantly, it meant I could use our Cosmic Shimmer Chalk paints to make them whatever colour I wanted.
For the letters, I painted them red and washed some white over that after they had dried,.. the white baubles are also painted white, then I made a pva glue wash (water and glue mix), painted them with this, then covered them in Diamond Frost glitter,.. by doing this, it meant I kept all the detail of the holly leaves 🙂
Now, you wouldn’t believe how much trouble I had finding the pine cones!, but I did,… on the park where we walk Rufus ha ha, these were given a light whitewash too with the white gesso (must have!) as opposed to chalk paint (it’s just a little bit stronger in colour)
The layout took some getting right,.. I did (if I’m honest) have to make 5 more poinsettias!) and then just played around until I was happy where everything went, then stuck everyhthing on (little tip for you – take a photo of your layout before you start sticking it together, you can check the photo as you go along)
(I used my trusty Cosmic Shimmer PVA Glue for everything except the pine cones (used my hot glue gun)
And here it is (finally, I hear you say)

I really hope you like it,.. I absolutely love it, love the techniques, love the products, love the style, love the whole process and finished result!
I have already started my next one and will take photos step by step so I can do a step by step post for you next time, if you’re like me, you like to see how things look as we go along… 🙂
You’ll also notice, there is no metal on this canvas,… that was by design, but the next one… well,….
Now (I’m off to play with my new stamps,.. my last new release of 2018 and they are AMAZING!!!)
(you will see them at Ally Pally if you’re coming or on Hochanda at the end of September)
Happy Crafting!


Absolutely love your Xmas mixed media project. I am inspired xx
LikeLike
How fabulous is this, absolutely love it x
LikeLike
Well done you. Who would have thunk it!
Teresa
LikeLike
Gosh, that is great! I really like it!!! I’m like you, in that I like my cards to look pretty, so MultiMedia made me nervous…. so there is hope for me yet?!
LikeLike
It’s AB FAB Phill. Really feel inspired to have a go myself now – but may wait for the step by step one that’s on the way.xx
LikeLike
Wow Phill that is really gorgeous. Well done you for trying something different. Really, really love it. xxxxxxx
LikeLike
This is fab and soooo pretty. Would make lovely Xmas presents! Who would have thought it….. Phill getting messy(well kind of! 😂)
LikeLike
I was the same not for me. Now i cant get enough . Love experimenting now with my cards but still like pretty .
LikeLike
absolutely stunning Phill, I would expect no less from you xx
LikeLike
Looks fantastic
I still have some mounds that I used with Fimo many years ago. Would they be ok to use with this clay?
Sue
LikeLike
Sorry I meant mounds. Darned auto correct!
By the way we are knee deep in pine cones in the New Forest.
Sue
LikeLike
Stupid auto correct it will not wrote MOULDS. GRRR!
LikeLike
Well Phill, I have had to save this blog ‘cos it’s fabulous!!! That’s how I want to learn mixed media!! xx
LikeLike
Oh my, that is absolutely stunning. Love, love, love it. This has knocked it completely out of the ball park. Well done.
LikeLike
OMG Phill that’s gorgeous x but you didn’t say how messy you got lol xx
LikeLike
Such a beautiful canvas Phill you really should be proud of it, but who would have thought this of you lol xx
LikeLike
Wow, wow, Wow!
LikeLike
Always love your cards but this is absolutely gorgeous. Thanks for the set-by-step intro to mixed media, it has always seemed too arty for me and to involved. Yes, it is involved but you’ve made it achievable for me and many others judging by other comments. Thanks Phill for your courageous steps into the unknown.
LikeLike